Your sump pump battery is your home’s silent guardian against flooding. When it fails, you lose protection during power outages-exactly when you need it most.
We at Ace Plumbing & Sewer know that sump pump battery replacement isn’t glamorous, but it’s one of the smartest maintenance moves homeowners in Burr Ridge, Hinsdale, and Western Springs can make. This guide walks you through everything from spotting warning signs to installing your new battery safely.
When Should You Replace Your Sump Pump Battery
Most lead-acid batteries in sump pump backup systems last between 3 and 5 years, and this timeline is your best starting point for planning replacement. If your system is older than 5 years, replacement should be on your radar regardless of current performance. A wet-cell deep-cycle battery, the most common type in these systems, typically handles 500 to 800 charge cycles before capacity drops significantly. That translates to roughly 3 to 5 years of normal operation depending on how often your pump activates during storms and power outages. Gel-cell batteries last slightly longer at 800 to 1,000 cycles, while AGM batteries push toward 800 to 1,200 cycles. If your charger is a simple float charger rather than a true 3-stage charger, expect the battery to fail sooner-sometimes within 3 years-because float chargers constantly maintain high voltage and gradually degrade the battery plates.

A proper 3-stage charger can extend battery life significantly, so if your system is underperforming, the charger itself may be the culprit.
Check Your Battery’s Voltage
Check your battery’s resting voltage with a basic digital voltmeter; a healthy battery reads around 12.5 volts when idle and approximately 13 volts while actively charging. If your battery sits at 12.43 volts or lower while connected to the charger, it’s approaching end of life and needs replacement soon. This simple test takes minutes and reveals whether your battery still has capacity left.
Recognize Alarm Signals and Performance Red Flags
An alarm sounding from your backup system is the clearest warning sign that something is wrong. Start by adding distilled water to wet-cell batteries if water levels have dropped below the lead plates-this simple step resolves many false alarms. If the alarm persists after topping off water, inspect the battery terminals for white, blue, or green corrosion buildup. Use a wire brush to scrub the posts clean, re-tighten all connections, and test again. Persistent alarms after cleaning usually point to a battery nearing failure or a charger malfunction.
Visual inspection matters too: look for a bulging or cracked battery case, which signals internal failure and demands immediate replacement. Shorter runtime during outages is another red flag-if your pump runs for only a few hours instead of the expected 8 to 12 hours, the battery capacity has declined sharply. In Clarendon Hills, Hinsdale, and Western Springs where summer storms bring frequent outages, a battery that once gave you overnight protection but now fails within hours is unreliable and should be replaced.
Test Your Battery’s True Health
A load tester, available for roughly $20 at auto parts stores, applies a 100-amp load to your battery and shows whether it can handle real-world demands. Perform this test every 6 months to catch decline early. If the battery voltage drops below 9.6 volts under load, replacement is overdue. Many homeowners skip testing and only learn their battery is dead when a storm hits and the pump fails to run-that’s too late.
Test your system’s built-in test button monthly by pressing it to trigger the backup pump; if the pump doesn’t start or runs weakly, battery failure is likely. If you’ve replaced the battery recently but alarms continue or the charger output reads lower than 13 volts while charging, the charger itself may be faulty and needs replacement or inspection. Before assuming the worst about your battery, verify the charger is working correctly (a bad charger will kill even a brand-new battery within months).
Know When Professional Help Matters
If testing reveals a faulty charger or if you’re uncertain about your battery’s condition, a licensed plumber can assess your entire backup system and recommend the right solution. Homeowners in Hodgkins, Bridgeview, and Hickory Hills often find that professional inspection saves time and prevents costly failures during the next storm.
Replacing Your Sump Pump Battery the Right Way
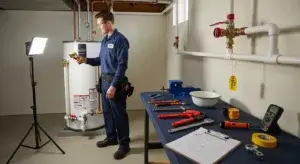
Replacing your sump pump battery is straightforward if you follow the correct sequence and use the right tools. Gather everything before you start: a new deep-cycle battery Group 27 or Group 31 depending on your battery box size, a digital voltmeter, heavy-duty work gloves, safety glasses, a wire brush, an adjustable wrench, and a helper to handle the weight since these batteries typically run 50 to 70 pounds. Check your system’s manual to confirm the required amp-hour rating usually 75Ah to 120Ah and terminal type so your new battery connects properly without forcing connections. Measure your existing battery box dimensions before purchasing to avoid the frustration of buying a battery that doesn’t fit. The most critical step happens first: unplug the charger from the wall outlet. This prevents electrical shock and ensures the charging circuit is dead before you touch anything. Never skip this step even if you think the system is safe.
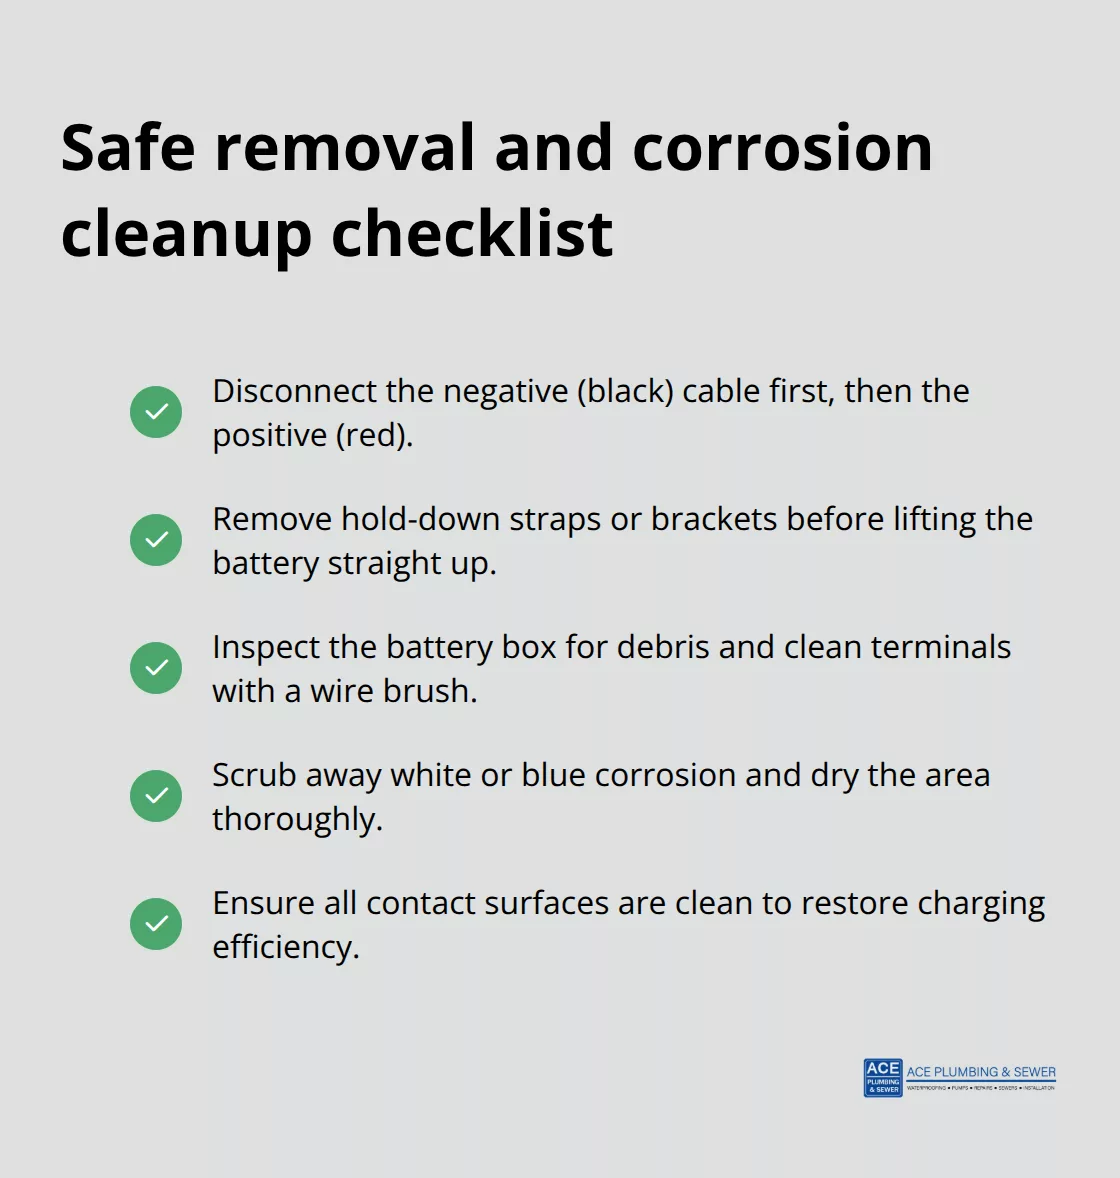
Remove the Old Battery Safely
Start by disconnecting the negative terminal (black cable) first, then the positive terminal (red cable). This order matters because disconnecting negative first prevents accidental shorts if your wrench touches the metal case. Remove any hold-down straps or brackets securing the battery to the box, then carefully lift the battery straight up and set it aside on a clean surface. Inspect the battery box interior for corrosion or debris; use a wire brush to clean the terminals and the inside surfaces where the new battery will sit. If you see white or blue corrosion buildup, scrub it away with the brush and wipe the area dry with a cloth. A corroded connection reduces charging efficiency and shortens your new battery’s lifespan, so this cleaning step directly impacts how long your replacement lasts.
For homeowners in Hickory Hills, Bridgeview, and Hodgkins where humidity and temperature swings are common, this corrosion cleaning is especially important because moisture accelerates terminal degradation.
Install and Connect Your New Battery
Position the new battery into the box carefully, ensuring the terminals face the correct direction to match your cable connections. Connect the positive terminal (red cable) first, then the negative terminal (black cable), and tighten both connections firmly with your wrench. Loose connections cause voltage drop and trigger false alarms, so make this connection tight but not so tight that you crack the terminal post. Secure any hold-down straps to prevent the battery from shifting during pump operation or transport. Plug the charger back into the wall outlet and watch for a green indicator light, which signals the battery is charging correctly. If you see a red or yellow light, the charger is still working but the battery isn’t fully charged yet; give it several hours before testing. If the light remains red after 24 hours or the alarm sounds immediately after installation, your charger may be faulty or the new battery may have a manufacturing defect.
Test Your System After Installation
Test your backup system using the built-in test button to confirm the pump activates smoothly; a weak or delayed start suggests a connection problem or the charger needs inspection. Homeowners in Clarendon Hills, Western Springs, and Hinsdale benefit from scheduling professional inspection if problems persist, since a faulty charger will destroy even a brand-new battery within months and leave you unprotected during the next power outage. A licensed plumber can assess your entire backup system and recommend the right solution if testing reveals a faulty charger or if you’re uncertain about your battery’s condition. With your new battery installed and tested, the next step is learning how to maintain it properly so it delivers reliable protection for years to come.
Maintain Your Battery for Long-Term Protection
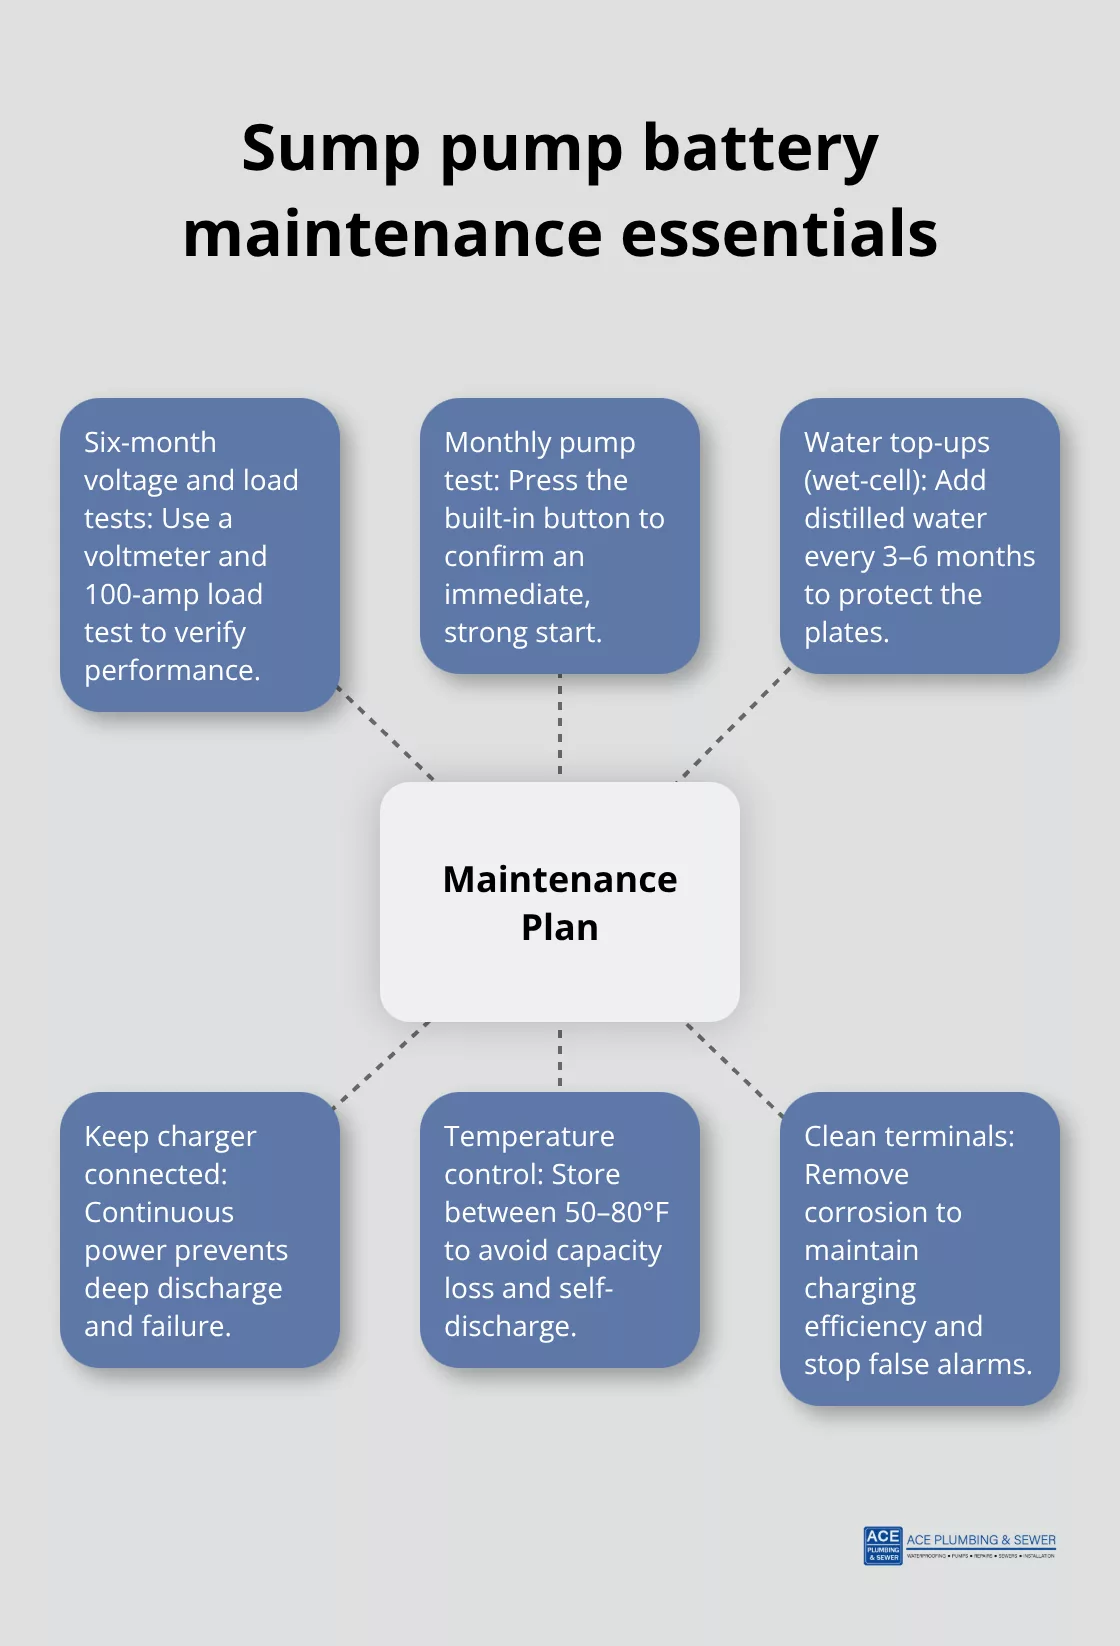
Test Your Battery Every Six Months
A basic digital voltmeter reveals your battery’s true health in minutes. Check the resting voltage-a healthy battery reads around 12.5 volts when idle-and repeat this test twice yearly to spot gradual decline. If voltage drops below 12.3 volts, replacement approaches soon. A load tester (roughly $20 at auto parts stores) applies a 100-amp load to simulate real-world demands; if voltage falls below 9.6 volts under load, your battery cannot handle a power outage reliably. Many homeowners skip this testing and only discover battery failure during a storm, leaving their basement unprotected. Press your system’s built-in test button monthly to verify the backup pump starts immediately and runs at full power-a sluggish or delayed start signals battery weakness.
For residents in Bridgeview, Hodgkins, and Hickory Hills where summer storms bring frequent outages, this monthly test serves as your early warning system.
Choose the Right Charger to Extend Battery Life
Your charger determines battery lifespan more than any other factor. A 3-stage charger extends battery life through proper charge management, while a simple float charger-the cheaper option bundled with many systems-constantly maintains high voltage and kills batteries within 3–5 years. Float chargers overcharge by design, gradually degrading the lead plates until capacity vanishes. If your battery fails prematurely despite proper water maintenance, the charger is likely the culprit. Check your charger output with a voltmeter; it should read approximately 13 volts while actively charging. If the charger output stays below 13 volts or exceeds 14.5 volts, the charger itself needs replacement.
Maintain Wet-Cell Batteries Properly
Wet-cell batteries demand distilled water top-ups every three to six months-tap water introduces minerals that corrode plates internally, so never substitute. Keep the battery area well-ventilated since wet-cell batteries vent hydrogen gas during charging. Store spare batteries in a cool, dry location between 50 and 80 degrees Fahrenheit; extreme heat accelerates self-discharge while freezing temperatures reduce capacity temporarily. Homeowners in Clarendon Hills, Western Springs, and Hinsdale should avoid placing batteries in uninsulated garages or basements where temperature swings are extreme.
Clean Terminals and Keep Your Charger Plugged In
Corrosion on terminals blocks charging current and triggers false alarms-clean white, blue, or green buildup monthly with a wire brush and reconnect firmly. Many homeowners ignore corrosion thinking it’s cosmetic, but it directly reduces charging efficiency and shortens your replacement battery’s life by years. Chargers must stay plugged in constantly to maintain charge (unplugging during vacation or for storage guarantees a dead battery when you need it most). Your backup system loses all protection the moment power disconnects from the charger, so treat constant power as non-negotiable for reliable protection during storms.
Final Thoughts
Your sump pump battery replacement protects your home from flooding when power fails, and the steps in this guide equip you to handle the task confidently. A 3-stage charger and testing every six months extend battery life well beyond the standard 3 to 5 years, keeping your basement dry during storms. Flood damage costs homeowners thousands in repairs and mold remediation, so your backup system stands as the barrier between a dry basement and disaster.
If voltage readings don’t improve, alarms persist after installation, or testing reveals a faulty charger, professional inspection becomes necessary. We at Ace Plumbing & Sewer serve homeowners throughout Burr Ridge, Clarendon Hills, Western Springs, Hinsdale, and nearby communities with expert sump pump assessments and repairs. A faulty charger destroys even a brand-new battery within months, leaving you unprotected during the next power outage.
Contact our licensed team today for fast, professional service that keeps your home safe year-round. Whether you handle sump pump battery replacement yourself or call a professional plumber, the goal remains the same: reliable protection when you need it most. We’re here to help you avoid costly flood damage and maintain peace of mind through every storm season.