Sump pumps are your home’s unsung heroes, silently protecting against water damage and flooding. At Ace Plumbing & Sewer, we’ve seen firsthand the devastation that can occur when these crucial devices fail unexpectedly.
Learning how to test a sump pump is a vital skill for every homeowner. This guide will walk you through the process, helping you safeguard your property before it’s too late.
What’s a Sump Pump and Why Should You Care?
The Unsung Hero of Your Home
Sump pumps stand as your home’s first line of defense against water damage. These unassuming devices work tirelessly to keep your basement or crawl space dry, especially during heavy rains or snowmelt.

At Ace Plumbing & Sewer, we’ve witnessed numerous homes saved from flooding thanks to well-maintained sump pumps. Just 1 inch of water in the typical home can cause up to $25,000 worth of damage, according to FEMA and the National Flood Insurance Program.
How Sump Pumps Protect Your Property
A sump pump sits in a pit (called a sump) at the lowest point of your basement or crawl space. When water levels rise, the pump activates automatically, pushing excess water out through a discharge pipe away from your home’s foundation. This simple yet effective system can prevent thousands of dollars in water damage (a cost you definitely want to avoid).
Types of Sump Pumps
Two main types of sump pumps exist:
- Submersible Pumps: These pumps are fully immersed in the sump pit. They offer quieter operation and more power. Unlike pedestal sump pumps, submersible sump pumps run while being “submerged” underwater, so they are placed in a deeper sump pit.
- Pedestal Pumps: With the motor above the pit, these pumps provide easier access for maintenance but may produce more noise.
Red Flags: When Your Sump Pump Needs Attention
Don’t wait for a flood to discover your sump pump isn’t working. Watch for these warning signs:
- Strange noises: Grinding, gurgling, or rattling sounds can indicate mechanical issues.
- Frequent cycling: If your pump turns on and off repeatedly, it might be overworked or improperly sized.
- Visible rust: Corrosion can compromise your pump’s effectiveness.
- Age: Most sump pumps last 7-10 years. If yours approaches this age, it’s time for a checkup.
Regular testing ensures your sump pump stands ready when you need it most. In the next section, we’ll guide you through an effective step-by-step process to test your sump pump (and give you peace of mind).
How to Test Your Sump Pump in 4 Easy Steps
Testing your sump pump is a straightforward process that can save you from costly water damage. Follow these four steps to ensure your sump pump is ready for action when you need it most.

Step 1: Visual Inspection
Start by removing the sump pit cover and examining the pump and pit. Learn how to inspect, maintain, and troubleshoot your sump pump system to prevent flooding and protect your home. Look for debris, sediment, or any objects that could obstruct the pump’s operation. Clean out any foreign materials you find. Check the electrical cord for fraying or damage, and ensure it’s plugged into a working GFCI outlet.
Step 2: Float Switch Test
The float switch plays a key role in your pump’s automatic operation. To test it, gently lift the float switch. You should hear the pump activate. If it doesn’t, the switch may be faulty or stuck. This test takes less than a minute but can reveal issues that account for many sump pump problems.
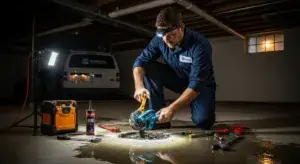
Step 3: Water Test
Pour about 5 gallons of water into the sump pit. This amount typically activates most residential sump pumps. Watch as the water level rises. The pump should turn on automatically, remove water, and then shut off once the water level drops. If the pump doesn’t activate or struggles to remove the water efficiently, it’s time for a professional inspection.
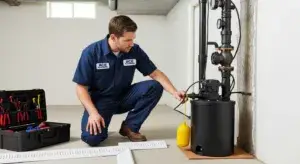
Step 4: Battery Backup Check
If you have a battery backup system, test it regularly. A battery backup system ensures continuous operation during power failures, maintaining protection against flooding. Unplug the main pump and pour water into the pit to activate the backup.
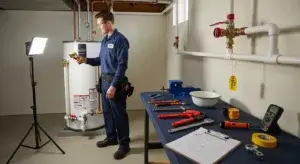
Importance of Professional Maintenance
While these steps can help you identify common issues, they don’t replace professional maintenance. We recommend having your sump pump professionally inspected annually. This can extend its lifespan and ensure it’s ready to protect your home when you need it most.
Try to perform these tests every three to four months to significantly reduce the risk of sump pump failure. Don’t wait for heavy rains to discover your pump isn’t working – a little prevention goes a long way in protecting your home from water damage.
Now that you know how to test your sump pump, let’s explore some common problems you might encounter and how to solve them.
Troubleshooting Common Sump Pump Issues
Clogged or Frozen Discharge Pipes
Blocked discharge pipes prevent effective water removal, potentially leading to flooding. In winter, freezing poses a particular risk. To prevent these issues:
- Install your discharge pipe with a slight downward slope.
- Use a freeze-prevention discharge line attachment.
- Clear debris from the discharge area regularly.
For suspected clogs, try running hot water through the pipe. If this doesn’t work, call a professional for assistance.
Float Switch Failures
A malfunctioning float switch can prevent your pump from activating when needed. To address this:
- Remove debris around the float.
- Ensure the float doesn’t touch the sump pit sides.
- Test the float by lifting it manually.
If these steps don’t solve the problem, you might need a float switch replacement (a task best left to professionals).
Motor Burnout
Overwork or age can lead to motor burnout. Signs include:
- Unusual pump noises
- Constant pump operation
- Failure to start when water fills the pit
A burnt-out motor often signals the need for a new sump pump. With an average lifespan of 7-10 years, consider proactive replacement as your pump ages.
Inadequate Pump Capacity
Sometimes, the pump itself works fine but lacks the necessary capacity. If your pump runs frequently or struggles during heavy rains, it might be undersized. Consider:
- Your home’s foundation size
- Local rainfall patterns
- Your area’s water table
Upgrading to a higher capacity pump can offer better flood protection. We at Ace Plumbing & Sewer can assess your needs and recommend the right pump size for your home.
Professional Maintenance
While DIY checks help, they don’t replace professional maintenance. An annual professional inspection can catch potential problems early and extend your pump’s life. This small investment can prevent water damage, extend pump lifespan, improve energy efficiency, reduce unexpected repair costs, and ensure proper functioning.

Final Thoughts
Regular sump pump tests protect your home from water damage. You should test your sump pump every three to four months to prevent costly repairs. Professional help becomes necessary when persistent issues arise or when your pump nears the end of its lifespan.
We at Ace Plumbing & Sewer specialize in sump pump installation, repair, and maintenance. Our team offers fast, reliable service for residential and commercial properties across the western Chicago suburbs. We provide same-day service and long-term solutions tailored to your needs.
Don’t wait for a flood to discover your sump pump doesn’t work. Professional inspections can give you peace of mind and protect your property from water damage. Trust Ace Plumbing & Sewer to keep your sump pump running smoothly (and your home dry).